Guide
Best Silicone Molds For Halloween Treats
Our honest guide to best silicone molds for halloween treats — what actually matters, what to skip, and how to choose well.
Our honest guide to best silicone molds for halloween treats — what actually matters, what to skip, and how to choose well.
 Best Overall
 Also Great
 Amazon
If you want clean little pumpkins, bats, ghosts, or skulls without fiddly hand-shaping, silicone molds are one of the easiest ways to make Halloween treats at home. They work especially well for chocolate, gummies, mini baked goods, and frozen bites, as long as you choose a food-safe mold, support it on a tray, and wait until the treats are fully set before unmolding.
Chocolate is usually the easiest place to start. It flows neatly into detailed cavities, sets firmly, and releases well from flexible silicone once fully chilled. For Halloween shapes with fine lines or little facial features, that matters.
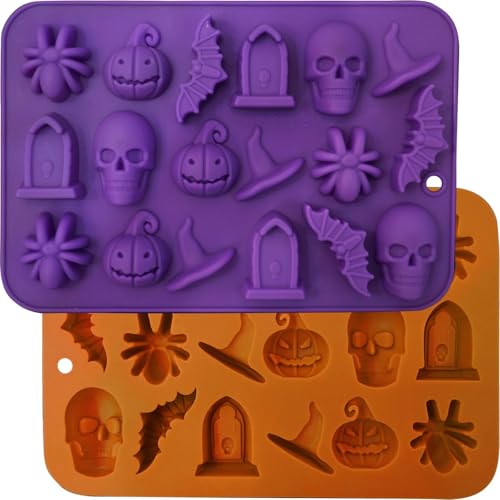
HUAKENER 4 Pack Halloween Candy Molds, Halloween Silicone Chocolate Mold
Shop at Amazon →I like to think about cavity size before anything else. Shallow molds with crisp details are ideal for chocolate, because the mixture can settle into small corners without leaving gaps. If a mold has narrow wings, stems, or teeth, it helps to fill those first with a small spoon or piping bag, then finish the rest of the cavity.
A few practical habits make a real difference. Let the melted chocolate cool slightly before pouring so it is fluid but not excessively hot. Tap the filled mold gently on the counter to knock out air bubbles, and chill it on a flat tray until every piece feels firm all the way through. If you try to unmold too early, the details soften first.
If you want a broad sense of the shapes commonly used for chocolate, gummies, cookies, and jelly sweets, this overview of Halloween treat molds is useful for seeing the range of cavity styles.
Silicone is a very good match for gummies and gelatin-based treats because warm mixtures pour easily into intricate cavities. Ghosts, candy corn shapes, and small pumpkins tend to come out especially neatly when the mixture is still fluid enough to reach the corners.
The main issue here is stickiness. A very light film of neutral oil can help with release, but too much will make the surface look dull. I keep it minimal. It also helps to chill the filled mold on a level tray so the shapes set evenly, then peel the silicone away from the widest part of each piece rather than pulling directly on the candy.
If the finished gummies still feel tacky, a little sugar or cornstarch after unmolding can help. And if the mixture foams while you are making it, skim that foam before filling. Small bubbles are much more obvious in tiny Halloween shapes than in a plain pan of gelatin.
Baked treats can work beautifully in silicone molds, but this is where shape choice matters most. A simple pumpkin or ghost tends to bake and release more cleanly than a very intricate skull with lots of narrow edges. Thicker batters do not always settle neatly into fine details, so broader shapes are often the safer bet.
CAKETIME Mini Muffin Pan, Metal Reinforced Frame Mini Cupcake Pans 24 Cups Nonstick Muffin Silicone Molds with Handle fo
Shop at Amazon →For baking, I look for molds with walls sturdy enough to hold their shape once filled. Even then, flexible silicone needs support. Set the mold on a baking sheet before filling it, keep the cavities about two-thirds full, and move the whole tray together. That support helps prevent spills and keeps the batter level.
Moist cake batter usually performs better than a dry, crumbly brownie batter in detailed molds. If a design has tiny eyes, ridges, or points, a smoother batter is more likely to hold the shape once baked. A basic set of silicone mold baking instructions also reinforces the same core points: support the mold, avoid overfilling, and cool baked goods completely before release.
Cooling is the part people rush. Warm cake and brownie crumbs are delicate, and they tear easily when the mold flexes. Let the treats cool fully, loosen the edges gently, and only then turn the mold over to unmold.
Silicone molds are also useful for frozen yogurt bites, mousse, popsicles, and Halloween ice cubes. The flexible material makes it easier to pop out frozen shapes without cracking them, especially if the design has a few small details.
Leave a little headspace when filling because frozen mixtures expand. Then freeze the mold on a flat surface until the centers are solid. For ice cubes, clear water will give you sharper-looking shapes, while juice or colored drinks create more contrast for parties.
When it is time to release them, do not tug on thin parts like bat wings or pumpkin stems. Flex the cavity walls outward first and let the shape loosen gradually. If needed, a short rest at room temperature can soften the outer edge just enough to help.
A mold should be clearly labeled for food use and include care instructions and temperature guidance. That sounds obvious, but it is the easiest way to avoid using something not meant for baking, freezing, or direct food contact.
HKNMTT Halloween Molds Silicone for Chocolate 2 Pack, 3D Halloween Chocolate Candy Gummy Mold Skull Pumpkin Bat Ghost Wi
Shop at Amazon →I pay attention to three things: cavity shape, silicone firmness, and temperature range. Shallow cavities are generally better for chocolate, candy, and ice. Deeper cavities make more sense for mousse, gelatin desserts, and mini baked goods. Flexible walls help release details, but if the whole mold is too floppy, it becomes hard to fill and carry cleanly.
It also helps to keep food molds separate from craft molds. Materials like resin, wax, and soap can leave residues that do not belong anywhere near candy or cake. This food-safe mold guide makes the same point and is a good reminder to check intended use before bringing any mold into the kitchen.
The cleanest shapes usually come down to restraint. Fill slowly, keep the mold supported, and do not rush the release.
For chocolates and gummies, pull the silicone away from the shape instead of pushing the treat out aggressively. For baked goods, loosen the full perimeter first. For frozen treats, let the outer edge soften slightly if the mold feels stubborn.
The most common problems are predictable, which is actually helpful. Once you know what usually goes wrong, Halloween molds become much easier to use.
If you are choosing between a dramatic, intricate design and a simpler one, the simpler shape is often the better kitchen choice. A clean pumpkin almost always looks better than a skull that lost half its details on the way out of the mold.
Silicone lasts best when it is cleaned promptly and stored without pressure or deep folds. Warm soapy water and a soft sponge are usually enough, and a soft brush can help with grooves around teeth, eyes, or carved pumpkin lines.
Greasy residue needs to be removed completely, especially after chocolate. Lingering fat and odor can cling to silicone if it sits too long. If a mold picks up a smell, a baking soda paste can help before a thorough rinse and full air-dry.
Store molds flat if possible, and do not stack heavy items on top. If you need to layer them, keep them clean and dry and avoid sharp bends that can leave a crease over time. This general silicone mold storage guidance lines up with the same practical rule: keep them supported so they hold their shape.
Chocolate, candy melts, gummies, gelatin treats, mini cakes, brownies, mousse, frozen yogurt bites, and ice cubes all work well. The more detailed the cavity, the more it helps to use a smooth, pourable mixture.
Usually not for chocolate or candy if the mold is clean and the treats are fully set. A very thin layer of neutral oil can help with sticky gummies or some detailed baked goods.
They can if the manufacturer labels them oven-safe and gives a suitable temperature range. I would always keep the mold on a baking sheet and avoid direct contact with heating elements.
Use only a light coating of oil if needed, chill them completely, and peel the mold away from the widest part of each shape. If the surface is still tacky after release, a little sugar or cornstarch can help.
It is better not to. Food molds should stay dedicated to food, and any mold used for resin, wax, soap, or similar materials should stay out of the kitchen.
The best silicone molds for Halloween treats are the ones that match the job: shallow and detailed for chocolate, roomier and sturdier for baked goods, and flexible enough to release frozen or delicate shapes cleanly. Start with a food-safe mold, support it on a tray, and give your treats enough time to set, and the spooky part can stay on the table instead of in the process.

Paige Gilmore
Founder of Stripes & Willows — recipe creator, food photographer and stylist. Every guide is written to make honest, useful kitchen decisions easier.
More about Stripes & Willows →This page contains affiliate links. If you buy through them, Stripes & Willows may earn a commission at no extra cost to you — it never affects what we recommend.